[Spring - (7) ] Mybatis 설정하기
mybatis는 sql 명령어를 관리해주는 편리한 라이브러리이다.
1. 전통적인 JDBC 프로그램
- 직접 Connection을 맺고 마지막에 close()
- PreparedStatement 직접 생성 및 처리
- PreparedStatement 의 setXXX() 등에 대한 모든 작업을 개발자가 처리
- SELECT 의 경우 직접 RestulSet 처리
2. MyBatis
- 자동으로 Connection close() 처리
- 내부적으로 PreparedStatement 처리
- 리턴 타입을 지정하는 경우 자동으로 객체 생성 및 RestulSet 처리
pom.xml
|
1
2
3
4
5
6
7
8
9
10
11
12
13
14
15
16
17
18
19
20
21
22
23
|
<dependency>
<groupId>org.mybatis</groupId>
<artifactId>mybatis</artifactId>
<version>3.4.6</version>
</dependency>
<dependency>
<groupId>org.mybatis</groupId>
<artifactId>mybatis-spring</artifactId>
<version>1.3.2</version>
</dependency>
<dependency>
<groupId>org.springframework</groupId>
<artifactId>spring-jdbc</artifactId>
<version>${org.springframework-version}</version>
</dependency>
<dependency>
<groupId>org.springframework</groupId>
<artifactId>spring-test</artifactId>
<version>${org.springframework-version}</version>
</dependency>
Color Scripter
|
코드로 추가하는 방법이 위의 방법이고
아래의 방법은 Dependencies 목록을 이용하여 추가하는 방법이다.

이렇게 설정을 하고나면 maven에서 확인을 해준다.

root-context.xml
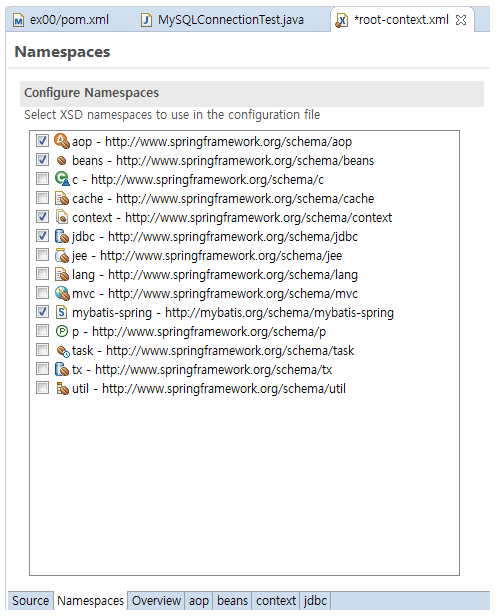
1. 사진과 같이 체크를 해준다.

2. 소스를 root-context.xml에 추가해준다.
|
1
2
3
4
5
6
7
|
<!-- Root Context: defines shared resources visible to all other web components -->
<bean id="dataSource" class="org.springframework.jdbc.datasource.DriverManagerDataSource">
<property name="driverClassName" value="com.mysql.jdbc.Driver"></property>
<property name="url" value="jdbc:mysql://localhost:3306/project3?serverTimezone=UTC&characterEncoding=utf-8"></property>
<property name="username" value="root"></property>
<property name="password" value="1111"></property>
</bean>
Color Scripter
|
그리고 추가적으로 root-context.xml에 아래와 같이 소스를 추가해준다.
|
1
2
3
4
5
|
<bean id="sqlSessionFactory" class="org.mybatis.spring.SqlSessionFactoryBean">
<property name="dataSource" ref="dataSource"></property>
<property name="configLocation" value="classpath:/mybatis-config.xml"></property>
</bean>
Color Scripter
|
- MyBatis 에서 가장 핵싱적인 객체는 SQLSession 이라는 존재와 SQLSessionFactroy 입니다.
- SQLSessionFactroy 의 이름에서 보듯이 내부적으로 SQLSession 이라는 것을 만들어 내는 존재.
- SQLSession 을 통해서 Connection 을 생성하거나 원하는 SQL 을 전달하고, 결과를 리턴 받는 구조로 작성한다.
- SQLSessionFactroy 를 등록하는 작업은 SQLSessionFactroyBean 을 이용합니다.
- 패키지명을 보면 MyBatis 의 패키지가 아니라 스프링과 연동 작업을 처리하는 mybatis.spring 라이브러리의 클래스임을 알 수 있습니다.
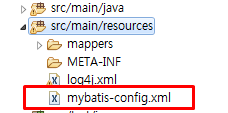
mybatis-config.xml
mybatis는 sql을 관리하는 만큼 sql의 관리 설정이나, sql문을 정의한 문서가 필요하다.

|
1
2
3
4
5
6
7
8
9
10
|
<?xml version="1.0" encoding="UTF-8"?>
<!DOCTYPE configuration
PUBLIC "-//mybatis.org//DTD Config 3.0//En"
"http://mybatis.org/dtd/mybatis-3-config.dtd">
<configuration>
<typeAliases>
<package name="org.zerock.domain"/>
</typeAliases>
</configuration>
|
mapper.xml

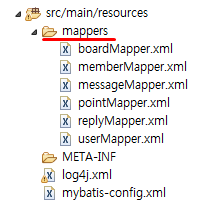
위의 그림은 다른 예제의 mapper들인데, 일단 경로가 어디인지만 파악해두자. Mybatis 테스트하는 것과는 관련은 없지만 mapper의 위치는 여기라고 알아만 두도록.
아래의 소스는 mapper.xml 파일에 들어가는 소스들이다. 위의 4줄은 공통사항이다.
|
1
2
3
4
5
6
7
8
9
10
11
12
|
<?xml version="1.0" encoding="UTF-8"?>
<!DOCTYPE mapper
PUBLIC "-//mybatis.org//DTD Mapper 3.0//EN"
"http://mybatis.org/dtd/mybatis-3-mapper.dtd">
<mapper namespace="com.smartbay.mapper.MemberMapper">
<select id="login" resultType="MemberVO">
select * from tbl_user where uid = #{uid} and upw = #{upw}
</select>
</mapper>
Color Scripter
|
테스트

위의 경로에 아래의 소스를 넣어 테스트를 진행한다.
|
1
2
3
4
5
6
7
8
9
10
11
12
13
14
15
16
17
18
19
20
21
22
23
24
25
26
27
28
29
30
31
32
33
34
35
36
37
38
39
|
package com.smartbay.controller;
import javax.inject.Inject;
import org.apache.ibatis.session.SqlSession;
import org.apache.ibatis.session.SqlSessionFactory;
import org.junit.Test;
import org.junit.runner.RunWith;
import org.springframework.test.context.ContextConfiguration;
import org.springframework.test.context.junit4.SpringJUnit4ClassRunner;
@RunWith(SpringJUnit4ClassRunner.class)
@ContextConfiguration(locations={"file:src/main/webapp/WEB-INF/spring/**/root-context.xml"})
public class DataSourceTest
{
@Inject
private SqlSessionFactory sqlFactory;
@Test
public void testFactory(){
System.out.println("\n >>>>>>>>>> sqlFactory 출력 : "+sqlFactory);
}
@Test
public void testSession() throws Exception{
try(SqlSession session = sqlFactory.openSession()){
System.out.println(" >>>>>>>>>> session 출력 : "+session+"\n");
} catch (Exception e) {
e.printStackTrace();
}
}
}
Color Scripter
|

위의 그림과 같이 뜨면 성공한 것이다.
'◽ Spring, SpringBoot' 카테고리의 다른 글
| [Spring - (10) ] 패키지명 변경 시, 콘솔에서 변경 전의 문서를 찾아갈 때. (0) | 2019.08.07 |
|---|---|
| [Spring - (9) ] JSON 설정 (0) | 2019.08.06 |
| [Spring - (8) ] Mysql 설정 및 테스트 (0) | 2019.08.06 |
| [Spring - (6) ] 특정 사이트 값 추출하기(웹 크롤링) - Jsoup (0) | 2019.08.03 |
| [Spring - (5) ] 한글이 깨질 때. (0) | 2019.08.03 |
| [Spring - (4) ] 명칭 정리 : JSON, handlebars, DOM, BOM, 트랜잭션, AOP (0) | 2019.07.23 |
| [Spring - (3) ] "Spring framework"의 xml파일 정리 (0) | 2019.07.17 |