[Spring] 네이버 api 로그인 연동
참고 : https://github.com/Blackseed/NaverLoginTutorial/wiki/Spring-MVC-%EB%A5%BC-%EC%9D%B4%EC%9A%A9%ED%95%98%EC%97%AC-%EB%84%A4%EC%9D%B4%EB%B2%84%EC%95%84%EC%9D%B4%EB%94%94%EB%A1%9C-%EB%A1%9C%EA%B7%B8%EC%9D%B8-%EC%A0%81%EC%9A%A9%ED%95%98%EA%B8%B0
참고 : https://m.blog.naver.com/PostView.nhn?blogId=sam_sist&logNo=220969407741&targetKeyword=&targetRecommendationCode=1
참고 : https://bumcrush.tistory.com/151
네이버 개발자 센터 : https://developers.naver.com/
1. 개요
- 회원가입 필요 없이 네이버 또는 구글 아이디를 갖고 있는 사람에게 서비스를 제공하는 웹
어플리케이션을 구현한다. 이때 웹 어플리케이션은 Spring MVC 기반으로 구현하며, 네이버와 구글
로그인 OPEN API 를 사용한다.
2. 기능
- 네이버 아이디로 로그인 가능
- 구글 아이디로 로그인 기능(14회차에서 설명)
3. 사용 기술 및 언어
- 개발 언어 및 기술: Spring MVC, JAVA, HTML, CSS, BootStrap, JavaScript, JQuery, JSP, EL, Servlet
- 개발 환경: Windows 7
- 개발 Tool: Spring Tool Suite(STS), Apache Tomcat
4. 진행 흐름
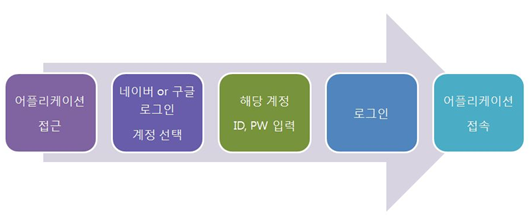
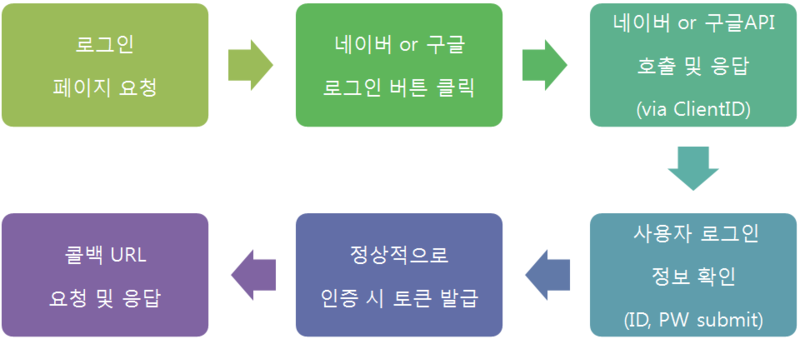
5. API 액션 흐름
본 사이트에 접속하기 위한 수단으로 네이버와 구글 API 로그인 버튼이 있다.
로그인 화면에 본인이 가입되어 있는 네이버 or 구글 사이트 버튼을 클릭한다.
버튼 클릭시 네이버에서 현재 사이트에 발급해준 웹어플리케이션 클라이언트ID, SECRET을 통해 네이버 로그인 API를 정상적으로 호출하면 해당 로그인 폼으로 이동한다.
(예를 들어, 네이버 로그인 버튼을 클릭하면 네이버 로그인 폼 페이지로 이동한다.)
사용자가 계정 정보(id, pw)를 올바르게 입력하면
계정 액세스 권한 요청 동의를 거친 후에 토큰이 발급되며, 로그인 성공페이지(콜백 URL)로 전환 된다
6. 결과화면

1. 로그인 첫 화면
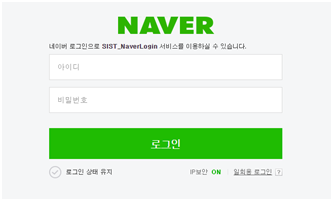
2. 네이버 계정 ID, PW 입력
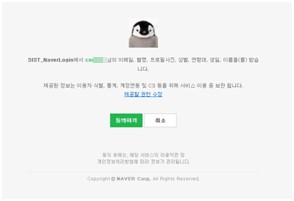
3. 개인정보 제공 동의화면

4. 로그인 성공 후 결과페이지
7. 환경설정(소스코드)
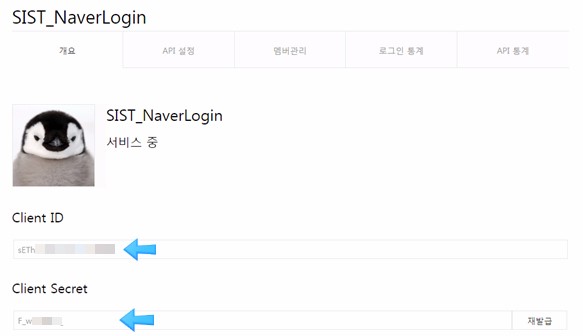
1. 네이버 어플리케이션 등록(API 이용신청) https://developers.naver.com/apps/#/register
등록하면 Client ID와 Client Secret(pw)을 발급해준다.
2. API 서비스 환경(Callback URL)설정
서비스 URL은 로그인 첫 화면(네이버 로그인 뱃지가 노출되는 화면)이고,
Callback URL은 로그인 성공시 요청되는 URL이다. 임의로 callback으로 지정.


*프로젝트 생성(STS툴에서 생성한 구조임)*
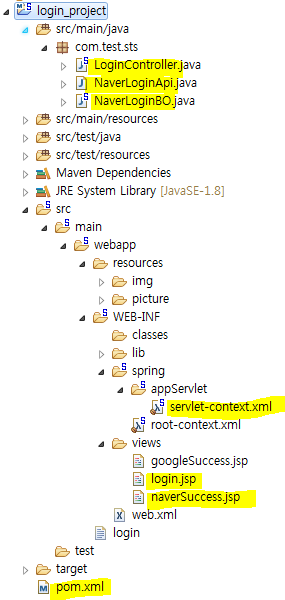
3. OAuth2.0 Java OpenSource Library 설정
네이버 아이디로 로그인을 간편하게 적용하기 위하여 OAuth2.0 프로토콜을 지원하는
Scribe OpenSource OAuth Java Library를 적용
▶pom.xml에 dependency 추가(com.github.scribejava 라이브러리 )
|
1
2
3
4
5
6
|
<!-- naver -->
<dependency>
<groupId>com.github.scribejava</groupId>
<artifactId>scribejava-core</artifactId>
<version>2.8.1</version>
</dependency>
|
▶Scribe library용 Naver Login 구현체 추가
|
1
2
3
4
5
6
7
8
9
10
11
12
13
14
15
16
17
18
19
20
21
22
23
24
25
26
27
28
29
|
package com.test.sts;
import com.github.scribejava.core.builder.api.DefaultApi20;
public class NaverLoginApi extends DefaultApi20{
protected NaverLoginApi(){
}
private static class InstanceHolder{
private static final NaverLoginApi INSTANCE = new NaverLoginApi();
}
public static NaverLoginApi instance(){
return InstanceHolder.INSTANCE;
}
@Override
public String getAccessTokenEndpoint() {
return "https://nid.naver.com/oauth2.0/token?grant_type=authorization_code";
}
@Override
protected String getAuthorizationBaseUrl() {
return "https://nid.naver.com/oauth2.0/authorize";
}
}
Color Scripter
|
4. NaverLoginBO 클래스 생성
인증 요청문을 구성해 줌

|
1
2
3
4
5
6
7
8
9
10
11
12
13
14
15
16
17
18
19
20
21
22
23
24
25
26
27
28
29
30
31
32
33
34
35
36
37
38
39
40
41
42
43
44
45
46
47
48
49
50
51
52
53
54
55
56
57
58
59
60
61
62
63
64
65
66
67
68
69
70
71
72
73
74
75
76
77
78
79
80
81
82
83
84
85
86
87
88
89
90
91
92
93
94
95
96
97
98
99
|
package com.test.sts;
import java.io.IOException;
import java.util.UUID;
import javax.servlet.http.HttpSession;
import org.springframework.util.StringUtils;
import com.github.scribejava.core.builder.ServiceBuilder;
import com.github.scribejava.core.model.OAuth2AccessToken;
import com.github.scribejava.core.model.OAuthRequest;
import com.github.scribejava.core.model.Response;
import com.github.scribejava.core.model.Verb;
import com.github.scribejava.core.oauth.OAuth20Service;
public class NaverLoginBO {
/* 인증 요청문을 구성하는 파라미터 */
//client_id: 애플리케이션 등록 후 발급받은 클라이언트 아이디
//response_type: 인증 과정에 대한 구분값. code로 값이 고정돼 있습니다.
//redirect_uri: 네이버 로그인 인증의 결과를 전달받을 콜백 URL(URL 인코딩). 애플리케이션을 등록할 때 Callback URL에 설정한 정보입니다.
//state: 애플리케이션이 생성한 상태 토큰
private final static String CLIENT_ID = "sE********************";
private final static String CLIENT_SECRET = "F_w******";
private final static String REDIRECT_URI = "http://211.63.89.90:8090/login_project/callback";
private final static String SESSION_STATE = "oauth_state";
/* 프로필 조회 API URL */
private final static String PROFILE_API_URL = "https://openapi.naver.com/v1/nid/me";
/* 네이버 아이디로 인증 URL 생성 Method */
public String getAuthorizationUrl(HttpSession session) {
/* 세션 유효성 검증을 위하여 난수를 생성 */
String state = generateRandomString();
/* 생성한 난수 값을 session에 저장 */
setSession(session,state);
/* Scribe에서 제공하는 인증 URL 생성 기능을 이용하여 네아로 인증 URL 생성 */
OAuth20Service oauthService = new ServiceBuilder()
.apiKey(CLIENT_ID)
.apiSecret(CLIENT_SECRET)
.callback(REDIRECT_URI)
.state(state) //앞서 생성한 난수값을 인증 URL생성시 사용함
.build(NaverLoginApi.instance());
return oauthService.getAuthorizationUrl();
}
/* 네이버아이디로 Callback 처리 및 AccessToken 획득 Method */
public OAuth2AccessToken getAccessToken(HttpSession session, String code, String state) throws IOException{
/* Callback으로 전달받은 세선검증용 난수값과 세션에 저장되어있는 값이 일치하는지 확인 */
String sessionState = getSession(session);
if(StringUtils.pathEquals(sessionState, state)){
OAuth20Service oauthService = new ServiceBuilder()
.apiKey(CLIENT_ID)
.apiSecret(CLIENT_SECRET)
.callback(REDIRECT_URI)
.state(state)
.build(NaverLoginApi.instance());
/* Scribe에서 제공하는 AccessToken 획득 기능으로 네아로 Access Token을 획득 */
OAuth2AccessToken accessToken = oauthService.getAccessToken(code);
return accessToken;
}
return null;
}
/* 세션 유효성 검증을 위한 난수 생성기 */
private String generateRandomString() {
return UUID.randomUUID().toString();
}
/* http session에 데이터 저장 */
private void setSession(HttpSession session,String state){
session.setAttribute(SESSION_STATE, state);
}
/* http session에서 데이터 가져오기 */
private String getSession(HttpSession session){
return (String) session.getAttribute(SESSION_STATE);
}
/* Access Token을 이용하여 네이버 사용자 프로필 API를 호출 */
public String getUserProfile(OAuth2AccessToken oauthToken) throws IOException{
OAuth20Service oauthService =new ServiceBuilder()
.apiKey(CLIENT_ID)
.apiSecret(CLIENT_SECRET)
.callback(REDIRECT_URI).build(NaverLoginApi.instance());
OAuthRequest request = new OAuthRequest(Verb.GET, PROFILE_API_URL, oauthService);
oauthService.signRequest(oauthToken, request);
Response response = request.send();
return response.getBody();
}
}
Color Scripter
|
5. Controller Class에서 BO Class를 이용할 수 있도록
Servlet xml에 NaverLoginBO Class에 대한 Bean설정 추가
|
1
2
|
<!-- NaverLoginBO Class에 대한 Bean설정 추가 -->
<beans:bean id="naverLoginBO" class="com.test.sts.NaverLoginBO" />
|
6. Login Controller 생성
|
1
2
3
4
5
6
7
8
9
10
11
12
13
14
15
16
17
18
19
20
21
22
23
24
25
26
27
28
29
30
31
32
33
34
35
36
37
38
39
40
41
42
43
44
45
46
47
48
49
50
51
52
53
54
55
56
57
58
59
60
61
62
63
64
65
66
67
|
package com.test.sts;
import java.io.IOException;
import javax.servlet.http.HttpSession;
import org.springframework.beans.factory.annotation.Autowired;
import org.springframework.social.google.connect.GoogleConnectionFactory;
import org.springframework.social.oauth2.GrantType;
import org.springframework.social.oauth2.OAuth2Operations;
import org.springframework.social.oauth2.OAuth2Parameters;
import org.springframework.stereotype.Controller;
import org.springframework.ui.Model;
import org.springframework.web.bind.annotation.RequestMapping;
import org.springframework.web.bind.annotation.RequestMethod;
import org.springframework.web.bind.annotation.RequestParam;
import com.github.scribejava.core.model.OAuth2AccessToken;
/**
* Handles requests for the application home page.
*/
@Controller
public class LoginController {
/* NaverLoginBO */
private NaverLoginBO naverLoginBO;
private String apiResult = null;
@Autowired
private void setNaverLoginBO(NaverLoginBO naverLoginBO) {
this.naverLoginBO = naverLoginBO;
}
//로그인 첫 화면 요청 메소드
@RequestMapping(value = "/login", method = { RequestMethod.GET, RequestMethod.POST })
public String login(Model model, HttpSession session) {
/* 네이버아이디로 인증 URL을 생성하기 위하여 naverLoginBO클래스의 getAuthorizationUrl메소드 호출 */
String naverAuthUrl = naverLoginBO.getAuthorizationUrl(session);
//https://nid.naver.com/oauth2.0/authorize?response_type=code&client_id=sE***************&
//redirect_uri=http%3A%2F%2F211.63.89.90%3A8090%2Flogin_project%2Fcallback&state=e68c269c-5ba9-4c31-85da-54c16c658125
System.out.println("네이버:" + naverAuthUrl);
//네이버
model.addAttribute("url", naverAuthUrl);
/* 생성한 인증 URL을 View로 전달 */
return "login";
}
//네이버 로그인 성공시 callback호출 메소드
@RequestMapping(value = "/callback", method = { RequestMethod.GET, RequestMethod.POST })
public String callback(Model model, @RequestParam String code, @RequestParam String state, HttpSession session)
throws IOException {
System.out.println("여기는 callback");
OAuth2AccessToken oauthToken;
oauthToken = naverLoginBO.getAccessToken(session, code, state);
//로그인 사용자 정보를 읽어온다.
apiResult = naverLoginBO.getUserProfile(oauthToken);
model.addAttribute("result", apiResult);
/* 네이버 로그인 성공 페이지 View 호출 */
return "naverSuccess";
}
}
Color Scripter
|
http://colorscripter.com/info#e" target="_blank" style="text-decoration:none;color:white">cs |
8. login.jsp(로그인 페이지)
|
1
2
3
4
5
6
7
8
9
10
11
12
13
14
15
16
17
18
19
20
21
22
23
24
25
26
27
28
|
<%@ page language="java" contentType="text/html; charset=UTF-8"
pageEncoding="UTF-8"%>
<!DOCTYPE html PUBLIC "-//W3C//DTD HTML 4.01 Transitional//EN" "http://www.w3.org/TR/html4/loose.dtd">
<html>
<head>
<title>LoginTest</title>
<script type="text/javascript" src="https://static.nid.naver.com/js/naverLogin_implicit-1.0.2.js" charset="utf-8"></script>
<script type="text/javascript" src="http://code.jquery.com/jquery-1.11.3.min.js"></script>
<style type="text/css">
html, div, body,h3{
margin: 0;
padding: 0;
}
h3{
display: inline-block;
padding: 0.6em;
}
</style>
</head>
<body>
<div style="background-color:#15a181; width: 100%; height: 50px;text-align: center; color: white; "><h3>SIST Login</h3></div>
<br>
<!-- 네이버 로그인 화면으로 이동 시키는 URL -->
<!-- 네이버 로그인 화면에서 ID, PW를 올바르게 입력하면 callback 메소드 실행 요청 -->
<div id="naver_id_login" style="text-align:center"><a href="${url}"><img width="223" src="${pageContext.request.contextPath}/resources/img/naver_Bn_Green.PNG"/></a></div>
<br>
</body>
</html>
Color Scripter
|
9. naverSuccess.jsp(로그인 성공페이지)
|
1
2
3
4
5
6
7
8
9
10
11
12
13
14
15
16
17
18
19
20
21
22
23
24
25
26
27
28
29
30
31
32
33
34
35
36
37
38
39
40
41
42
43
44
|
<%@ page language="java" contentType="text/html; charset=UTF-8"
pageEncoding="UTF-8"%>
<%@ taglib prefix="c" uri="http://java.sun.com/jsp/jstl/core"%>
<%@ taglib prefix="fmt" uri="http://java.sun.com/jsp/jstl/fmt"%>
<!doctype html>
<html lang="ko">
<head>
<script type="text/javascript"
src="https://static.nid.naver.com/js/naverLogin_implicit-1.0.2.js"
charset="utf-8"></script>
<script type="text/javascript"
src="http://code.jquery.com/jquery-1.11.3.min.js"></script>
<style type="text/css">
html, div, body, h3 {
margin: 0;
padding: 0;
}
h3 {
display: inline-block;
padding: 0.6em;
}
</style>
<script type="text/javascript">
$(document).ready(function() {
var name = ${result}.response.name;
var email = ${result}.response.email;
$("#name").html("환영합니다. "+name+"님");
$("#email").html(email);
});
</script>
</head>
<body>
<div
style="background-color: #15a181; width: 100%; height: 50px; text-align: center; color: white;">
<h3>SIST Naver_Login Success</h3>
</div>
<br>
<h2 style="text-align: center" id="name"></h2>
<h4 style="text-align: center" id="email"></h4>
</body>
</html>
Color Scripter
|
'◽ Spring, SpringBoot' 카테고리의 다른 글
| [Spring 기록] 다음 API 주소명을 좌표값으로 변환 할 시 "KA Header is required but neither os nor origin field is given"이라는 메시지가 뜰 때 (0) | 2019.09.15 |
|---|---|
| [Spring 기록] 다른 컴퓨터에서 import하여 작업 할 시 한글 깨짐 현상. (0) | 2019.09.11 |
| [Spring 기록] Controller에서 jsp에서 받은 값이 "value, value"로 찍혀 두개 값이 들어 올 때 (0) | 2019.09.02 |
| [Spring - 라이브러리(dependency) - xml 관련 ] 썸네일 (0) | 2019.08.22 |
| [Spring - 라이브러리(dependency) - xml 관련 ] 파일 업로드, MultipartResolver (0) | 2019.08.21 |
| [Spring 기록] 컨트롤러 기능별로 코드 구성 시 이점. (0) | 2019.08.21 |
| [Spring 기록] ajax success 문제(리턴값이 안 올 때) [@Controller vs @RestController ] (0) | 2019.08.20 |